Matching the use of `#ifdef AUDIO_ENABLE` used in `matrix_init_kb()` in order to compile firmware for the Let's Split keyboard without audio enabled. |
8 years ago | |
|---|---|---|
| .. | ||
| imgs | 9 years ago | |
| keymaps | 8 years ago | |
| Makefile | 9 years ago | |
| config.h | 8 years ago | |
| eeprom-lefthand.eep | 9 years ago | |
| eeprom-righthand.eep | 9 years ago | |
| i2c.c | 8 years ago | |
| i2c.h | ||
| lets_split.c | 8 years ago | |
| lets_split.h | 9 years ago | |
| matrix.c | 8 years ago | |
| pro_micro.h | 9 years ago | |
| readme.md | 9 years ago | |
| rules.mk | 8 years ago | |
| serial.c | 8 years ago | |
| serial.h | ||
| split_util.c | 8 years ago | |
| split_util.h | 9 years ago | |
readme.md
Let's Split
This readme and most of the code are from https://github.com/ahtn/tmk_keyboard/
Split keyboard firmware for Arduino Pro Micro or other ATmega32u4 based boards.
Features
Some features supported by the firmware:
- Either half can connect to the computer via USB, or both halves can be used independently.
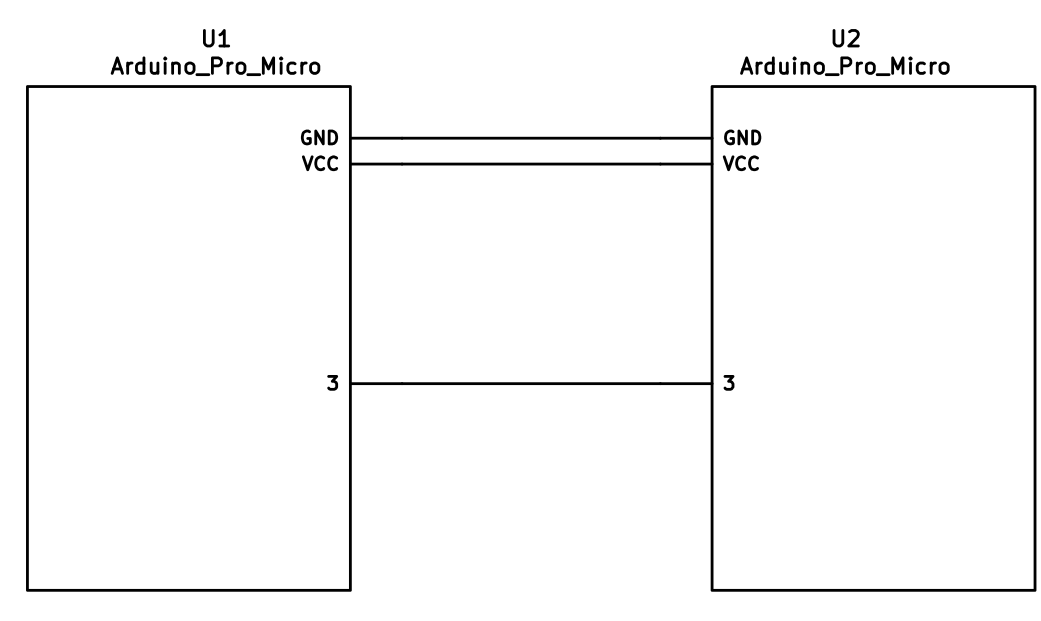
- You only need 3 wires to connect the two halves. Two for VCC and GND and one for serial communication.
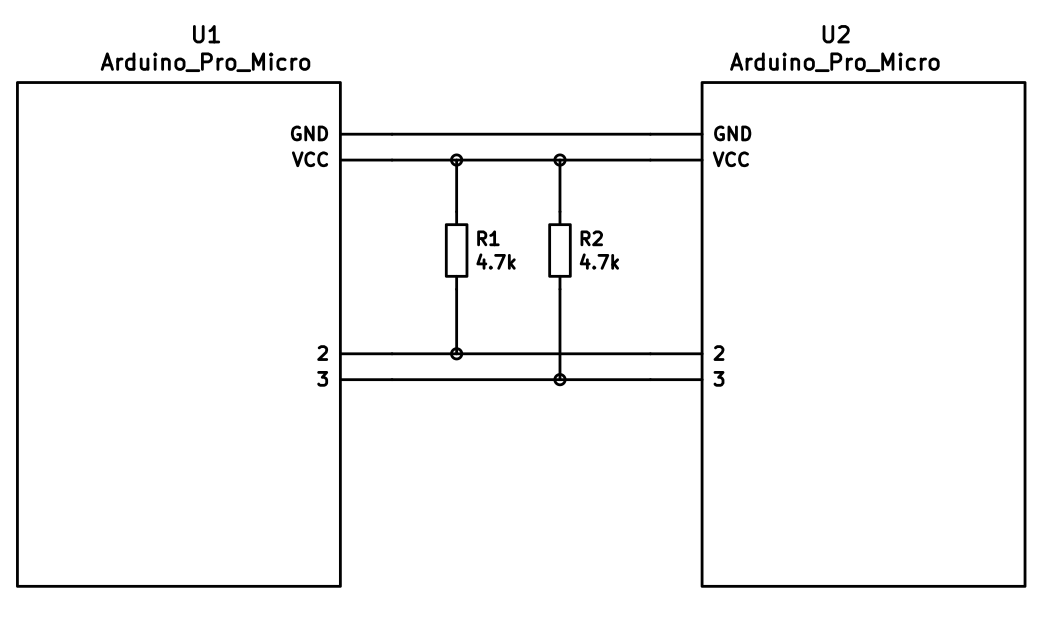
- Optional support for I2C connection between the two halves if for some reason you require a faster connection between the two halves. Note this requires an extra wire between halves and pull-up resistors on the data lines.
Required Hardware
Apart from diodes and key switches for the keyboard matrix in each half, you will need:
- 2 Arduino Pro Micro's. You can find theses on aliexpress for ≈3.50USD each.
- 2 TRS sockets
- 1 TRS cable.
Alternatively, you can use any sort of cable and socket that has at least 3 wires. If you want to use I2C to communicate between halves, you will need a cable with at least 4 wires and 2x 4.7kΩ pull-up resistors
Optional Hardware
A speaker can be hooked-up to either side to the 5 (C6) pin and GND, and turned on via AUDIO_ENABLE.
Wiring
The 3 wires of the TRS cable need to connect GND, VCC, and digital pin 3 (i.e. PD0 on the ATmega32u4) between the two Pro Micros.
Then wire your key matrix to any of the remaining 17 IO pins of the pro micro
and modify the matrix.c accordingly.
The wiring for serial:
The wiring for i2c:
The pull-up resistors may be placed on either half. It is also possible to use 4 resistors and have the pull-ups in both halves, but this is unnecessary in simple use cases.
Notes on Software Configuration
Configuring the firmware is similar to any other TMK project. One thing
to note is that MATIX_ROWS in config.h is the total number of rows between
the two halves, i.e. if your split keyboard has 4 rows in each half, then
MATRIX_ROWS=8.
Also the current implementation assumes a maximum of 8 columns, but it would not be very difficult to adapt it to support more if required.
Flashing
If you define EE_HANDS in your config.h, you will need to set the
EEPROM for the left and right halves. The EEPROM is used to store whether the
half is left handed or right handed. This makes it so that the same firmware
file will run on both hands instead of having to flash left and right handed
versions of the firmware to each half. To flash the EEPROM file for the left
half run:
make eeprom-left
and similarly for right half
make eeprom-right
After you have flashed the EEPROM for the first time, you then need to program the flash memory:
make program
Note that you need to program both halves, but you have the option of using different keymaps for each half. You could program the left half with a QWERTY layout and the right half with a Colemak layout. Then if you connect the left half to a computer by USB the keyboard will use QWERTY and Colemak when the right half is connected.

